Model EAH-A800
Possible cause and solutions
Check the following when you are encountering a problem with charging.
- Do not use any other USB charging cords except the supplied one. Doing so may cause malfunction.
- Make sure the computer is turned on and is not on standby or sleep mode.
- Check the direction of the terminals and plug in/out straight holding onto the plug. (It may result in malfunction by the deforming of the terminal if it is plugged in obliquely or in wrong direction.)
- the USB charging cord connected firmly to the USB terminal of the computer.
- Unplug the USB charging cord and plug it in again.
- Is the USB port you are currently using working properly? If your computer has other USB ports, unplug the connector from its current port and plug it into one of the other ports.
- Proper charging is not possible if there is dust or droplets of water on the charging terminal of the headphones. Remove the dust or water droplets before charging.
- Recharge in a room temperature between 10 °C and 35 °C (50 °F and 95 °F).
Model EAH-AZ40
Note: Battery consumption depends on the radio wave condition / usage and it is not equal between the right and left earbud under varying circumstances.
Possible cause and solutions
Check the following when you are encountering a problem with charging.
- Do not use any other USB charging cords except the supplied one. Doing so may cause malfunction.
- Have the earphones been put into the charging cradle correctly? Make sure that each earbuds are seated properly in the charging case. Cyan LED on the charging case will blink slowly 4 times if seated correctly.
- If the charging cradle LED (cyan) does not flash even after putting the earphones into the charging cradle, then there is no charge remaining in the charging cradle battery. First charge the charging cradle.
- Make sure the computer is turned on and is not on standby or sleep mode.
- the USB charging cord connected firmly to the USB terminal of the computer.
- Unplug the USB charging cord and plug it in again.
- Is the USB port you are currently using working properly? If your computer has other USB ports, unplug the connector from its current port and plug it into one of the other ports.
- Proper charging is not possible if there is dust or droplets of water on the charging terminal of the headphones. Remove the dust or water droplets before charging.
- Recharge in a room temperature between 10 °C and 35 °C (50 °F and 95 °F).
- Is the unit already fully charged? If you are trying to charge and the charging cradle LED goes out soon after starting, then the charging cradle is fully charged. If the charging cradle LED (cyan) does not blink with the earphones in the charging cradle when the lid of the charging cradle is opened, then the earphones are fully charged.
- If the charging time and operating time get shorter, the batteries in the earphones and charging cradle may be getting depleted. (Charging cycles for built-in batteries: about 500 times each)
The charging cradle LED does not light or blink even when you open the charging cradle lid.
- There is no charge in the battery. Use the USB charging cord (supplied) to charge.
- Take the earphones out of the charging cradle, and after unplugging the USB charging cord, close the lid and leave for 3 minutes. Then open the lid of the charging cradle and confirm that the power turns on.
The charging cradle LED (red) blinks rapidly.
- The unit are not charged correctly. Unplug the USB charging cord and plug it in again. If it still blinks red again contact an Authorized Panasonic Service center.
The charging cradle LED (cyan) blinks rapidly.
- The earphones are not inserted correctly. Please reinsert the earphones correctly.
- There is dust or droplets of water on the terminals of the earphones and charging cradle. Remove dust and water droplets.
Model EAH-AZ100
1. Check the Charging Case and Earbuds Connection
- Ensure that the earbuds are correctly inserted into the charging case. Misalignment can prevent proper contact with the charging terminals.
- Inspect the charging terminals on both the case and earbuds for any dust, dirt, or debris. Clean them gently with a soft, dry cloth if necessary.
2. Confirm Charging Case Battery
- Connect the charging case to a USB power source using the supplied USB-C cable.
- Check the LED indicators on the case:
- Blinking lights indicate charging.
- Solid lights indicate the case is fully charged.
- Ensure the charging cable is securely connected to both the case and the USB power source.
3. Verify the Power Source
- Plug the USB cable into a reliable 5V/1.5A USB power adapter or a USB port capable of supplying sufficient power.
- Avoid using low-power USB ports, such as those on older laptops or external hubs.
4. Reset the Earbuds
- Place both earbuds into the charging case.
- Ensure the case lid is closed for at least 10 seconds to reset the earbuds.
- Open the lid and check if the earbuds begin charging.
5. Inspect for Software or Hardware Issues
- Firmware Updates: Ensure your earbuds are running the latest firmware version. Connect the earbuds to the Technics Audio Connect App to check for updates.
- Battery Maintenance: If the earbuds have not been used for an extended period, leave them in the charging case connected to a power source for at least 30 minutes to revive the battery.
By following these steps, you should be able to resolve most charging issues with your EAH-AZ100 earbuds.
Model EAH-AZ40M2
Model EAH-AZ60
Model EAH-AZ60M2
- If the charging cradle status indicator LED turns off immediately when you try to charge, the charging cradle is fully charged. If the earphone status indicator LED turns off when you put the earphones in the charging cradle and open the lid, the earphones are fully charged.
- When charging using a PC, confirm the PC is turned on and is not in a standby or sleep mode. Check the USB type-C port is working fine on your PC. If not try other USB type-C ports.
- Check that the USB type-C charging cable is connected firmly between the charging case and the power source (USB Type-C adapter or PC USB-C port)
- Make sure that each earbud is seated properly into the charging case and are charging. Inside the charging case if there is Solid RED LED, it means that the earphones are charging. The charging completes when the RED LED indicator turns off.
- If the charging and operating time have gotten shorter, the internal batteries of the earphones and charging cradle may be exhausted. (Each internal battery can be recharged about 500 times.)
- Immediately after purchase or when this has not been used for a while, the charging cradle status indicator LED may not turn on for a few minutes after starting to charge, but will if you continue charging./li>
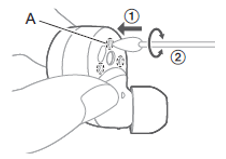
- If there is any foreign material (such as dust or earwax) on the charging terminals the device will not charge properly. Clean the charging terminals of the earphones as shown:
- Use a cotton swab with a pointed tip to wipe off dirt from the charging terminals of the earphones.

- Put the tip of the cotton swab on the charging terminal (A).
- Rotate the cotton swab to wipe off dirt.
- Use a cotton swab with a pointed tip to wipe off dirt from the charging terminals of the earphones.
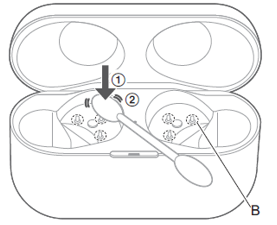
- Clean the charging terminals of the charging case as shown:
Clean the contact pins of the charging cradle with a cotton swab or soft dry cloth.

- Put the cotton swab on the tip of the contact pin (B) from above.
- Stroke the tip of the contact pin with a cotton swab to wipe off dirt.
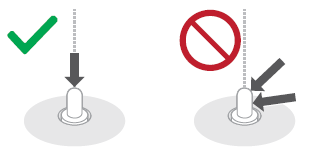
Note:Do not apply force to the contact pin from the side or at an angle. (It may result in malfunction.)

Model EAH-AZ70
Note: Battery consumption depends on the radio wave condition / usage and it is not equal between the right and left earbud under varying circumstances.
Possible cause and solutions
Check the following when you are encountering a problem with charging.
- Do not use any other USB charging cords except the supplied one. Doing so may cause malfunction.
- Have the earphones been put into the charging cradle correctly? Make sure that each earbuds are seated properly in the charging case. Cyan LED on the charging case will blink slowly 4 times if seated correctly.
- If the charging cradle LED (cyan) does not flash even after putting the earphones into the charging cradle, then there is no charge remaining in the charging cradle battery. First charge the charging cradle.
- Make sure the computer is turned on and is not on standby or sleep mode.
- the USB charging cord connected firmly to the USB terminal of the computer.
- Unplug the USB charging cord and plug it in again.
- Is the USB port you are currently using working properly? If your computer has other USB ports, unplug the connector from its current port and plug it into one of the other ports.
- Proper charging is not possible if there is dust or droplets of water on the charging terminal of the headphones. Remove the dust or water droplets before charging.
- Recharge in a room temperature between 10 °C and 35 °C (50 °F and 95 °F).
- Is the unit already fully charged? If you are trying to charge and the charging cradle LED goes out soon after starting, then the charging cradle is fully charged. If the charging cradle LED (cyan) does not blink with the earphones in the charging cradle when the lid of the charging cradle is opened, then the earphones are fully charged.
- If the charging time and operating time get shorter, the batteries in the earphones and charging cradle may be getting depleted. (Charging cycles for built-in batteries: about 500 times each)
The charging case is displaying a white LED, however the earbuds that are in the charging case are displaying a red LED.
- The charging case has it's own battery and the earbuds have their own battery built in. If an earbud's battery is low and is placed into the charging case, it will begin charging. If the battery level on the earbuds are low and the earbuds are currently in the charging case, there will be a red LED light on the earbuds indicating that they are at a low level of battery and are charging.
I have not used the earbuds since their last charge, but the battery level is now very low.
- If you leave the earbuds inside of a fully charged charging case, the battery level of the charging case becomes low or almost empty after 10 to 12 days of no use. This is because the charging case is constantly checking the status of the earbuds and consumes some amount of battery energy. This is normal condition. Fully re-charge both the charging case and earbuds.
The Charging case's LED lights do not turn on after opening up the charging case lid.
This indicates that the charging case battery level is low.
- Recharge the charging case battery by connecting it to a computer (USB) using the included USB charging cable.
- Reset the charging case.
- Remove the earbuds from the charging case, remove the USB charging cable and then close the charging case lid and wait for 3 minutes.
- Open the charging case lid and check if the power is on.
There are no LED lights lit or blinking on the earbuds and the earbuds are not powering on.
- Check if the earbuds are placed correctly in the charging case (charging contacts on the earbuds should be touching the case charging points).
- Charging case battery may be empty (The charging case is out of battery when there are no white LED's displayed). Charge the charging case by connecting it to a USB charging cable.
The LED lights on the earbuds do not turn red when they are put in the charging case.
- Put the earbuds into the charging case and wait until the earbud LEDs are displaying red, then remove earbuds and try again.
The LED lights on the earbuds are red and then turn off once the earbuds are in the charging case.
- If the earbud batteries are almost charged, the charging case stops charging the earbud for protection and the earbud LED (Red) will be off. This is normal.
Model EAH-AZ80
- If the charging cradle status indicator LED turns off immediately when you try to charge, the charging cradle is fully charged. If the earphone status indicator LED turns off when you put the earphones in the charging cradle and open the lid, the earphones are fully charged.
- When charging using a PC, confirm the PC is turned on and is not in a standby or sleep mode. Check the USB type-C port is working fine on your PC. If not try other USB type-C ports.
- Check that the USB type-C charging cable is connected firmly between the charging case and the power source (USB Type-C adapter or PC USB-C port)
- Make sure that each earbud is seated properly into the charging case and are charging. Inside the charging case if there is Solid RED LED, it means that the earphones are charging. The charging completes when the RED LED indicator turns off.
- If the charging and operating time have gotten shorter, the internal batteries of the earphones and charging cradle may be exhausted. (Each internal battery can be recharged about 500 times.)
- Immediately after purchase or when this has not been used for a while, the charging cradle status indicator LED may not turn on for a few minutes after starting to charge, but will if you continue charging./li>
- If there is any foreign material (such as dust or earwax) on the charging terminals the device will not charge properly. Clean the charging terminals of the earphones as shown:
- Use a cotton swab with a pointed tip to wipe off dirt from the charging terminals of the earphones.

- Put the tip of the cotton swab on the charging terminal (A).
- Rotate the cotton swab to wipe off dirt.
- Use a cotton swab with a pointed tip to wipe off dirt from the charging terminals of the earphones.
- Clean the charging terminals of the charging case as shown:
Clean the contact pins of the charging cradle with a cotton swab or soft dry cloth.

- Put the cotton swab on the tip of the contact pin (B) from above.
- Stroke the tip of the contact pin with a cotton swab to wipe off dirt.
Note:Do not apply force to the contact pin from the side or at an angle. (It may result in malfunction.)

