Basic feature
- Simultaneously control all Panasonic “HDAVI Control”
equipped components using one button on the TV remote.
- Enjoy additional HDMI Inter-Operability with compatible
Panasonic products.
- This TV supports “HDAVI Control 5” function.
- Connections to equipment (Blu-ray Disc player, DVD
recorder, HD Camcorder, Home Theater System, Amplifier, etc.)
with HDMI cables enables VIERA Link controls.
Available HDAVI Control Functions
Version - HDAVI Control or later.
- Automatic Input
Switching
- Power on
link
- Power
off link
- Speaker
control
Version - HDAVI Control 2 or later.
- VIERA Link
control only with the TV’s remote control
- Unselected device auto off
(for available equipment only)
Version - HDAVI Control 3 or later.
- Automatic lip-sync function
Version - HDAVI Control 4 or later.
- Energy saving mode (with Quick Start mode)
Version - HDAVI Control 5.
- Audio Return Channel Audio Return Channel (ARC) is a
function that enables digital sound signals to be sent via an
HDMI cable back from the TV to a connected audio device.
Connecting notes
Adding new equipment
- When adding new equipment, reconnecting equipment or
changing the setup after the connection, turn the equipment on
and then switch the TV on. Set the input mode to correct HDMI
terminal, and make sure that the image is displayed correctly.
- VIERA Link “HDAVI Control”, is based on the control
functions provided by HDMI and industry standard known as HDMI
CEC (Consumer Electronics Control), with unique function that
we have developed and added. As such, its operation with other
manufacturers’ equipment that supports HDMI CEC cannot be
guaranteed. Please refer to the individual manuals for other
manufacturers’ equipment supporting the VIERA Link function.
HDMI cable
This function needs an HDMI compliant (fully wired) cable.
Non-HDMI- compliant cables cannot be utilized.
- For more details on the external equipment’s connections,
please refer to the operating manual for the equipment.
HDMI connections to some Panasonic equipment allow you to
interface automatically.
- This function may not work normally depending on the
equipment condition.
- The equipment can be operated by other remote controls with
this function on, even if the TV is in Standby mode.
- Image or sound may not be available for the first few
seconds when playback starts.
- Image or sound may not be available for the first few
seconds when input mode is switched.
- Volume function will be displayed when adjusting the volume
of the equipment.
- If you connect equipment that has “HDAVI Control 2” or
later function to the TV with an HDMI cable, the sound from the
DIGITAL AUDIO OUT terminal can be output as multi-channel
surround.
- “HDAVI Control 5” is the newest standard for the HDAVI
Control compatible equipment.
This standard is compatible with the conventional HDAVI
equipment.
If the connection (or setting) of equipment compatible with
HDAVI control is changed, switch the power of this unit Off and
On again while the power of all equipment is On (so that the
unit can correctly recognize the connected equipment) and check
that the connected equipment playback operates.
VIERA Link connections
Depending on the model, it may be necessary to remove the
terminal cover / cable cover before connecting or disconnecting
cables.
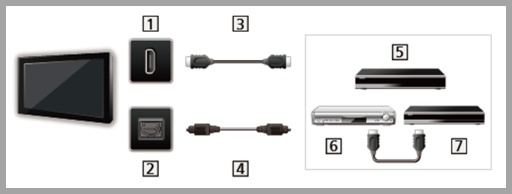
Connecting Blu-ray Disc player/DVD Recorder
Connect the HDMI terminal of this TV to the DVD recorder with
VIERA Link function using a fully wired HDMI cable.
- You can use any HDMI terminal on this TV.

- TV (HDMI)
- HDMI cable
- DVD recorder with VIERA Link function
Connecting Home theater system/AV amp
HDMI and Audio connection.
Connect the HDMI terminal and DIGITAL AUDIO OUT to Home Theater
System/AV amp with VIERA Link function using each fully wired
HDMI cable and Optical audio cable.
- Use a high speed HDMI cable for high resolution images.
- HDMI 2 is recommended.
- No optical cable is necessary when connecting a Home
Theater supporting “HDAVI control 5” with an HDMI cable.
Audio will be supported via ARC (Audio Return Channel)
- One AV amp and one Blu-ray Disc player/DVD recorder can be
operated with this unit by connecting with an HDMI cable.

- TV (HDMI)
- TV (DIGITAL AUDIO OUT)
- HDMI cable
- Optical cable
- Home theater system with VIERA Link function
- AV amp with VIERA Link function
- DVD recorder with VIERA Link function
Connecting an HD Camcorder/Digital camera
Press [INPUT] and select an available HDMI terminal, then
connect the HD camcorder/Digital camera with VIERA Link
function to this input with fully wired HDMI/mini HDMI cable.
- Use a high speed HDMI cable for
high resolution images.

- TV (HDMI)
- HDMI / mini HDMI cable
- HD Camcorder with VIERA Link function
- LUMIX with VIERA Link function
- Individual HDMI equipment may require additional menu
settings specific to each model. Please refer to their
respective manuals.
- When audio from other equipment connected to this unit via
the HDMI is output using “DIGITAL AUDIO OUT” of this unit, the
system switches to 2CH audio.
(When connecting to an AV amp via HDMI, you can enjoy higher
sound quality.)
- Some devices use Mini-HDMI terminal. HDMI (type A) to
Mini-HDMI (type C) cable or adapter should be used.
VIERA Link Settings
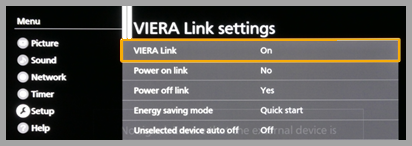
To use all VIERA Link functions: After everything is connected,
set
VIERA Link to
On in
VIERA
Link settings menu.
Some features are disabled depending on the “HDAVI Control”
version of the equipment.
Turning Viera Link On Method 1
- Press [MENU]
- Select "Setup",
press [ OK ]
- Select "VIERA Link
settings", press [ OK ]
- Select "VIERA
Link" and set to "On"

- Select and set other VIERA Link settings ( Power on link /
Power off link / Energy saving mode / Unselected device auto
off )
VIERA Link settings feature
Automatic Input Switching
When using a Blu-ray Disc player, DVD player/recorder or Home
theater system, the TV will automatically change to the
appropriate input, when playback begins on one of those
devices.
- For a Home Theater System the speakers automatically switch
to the theater system.
Power on link
Yes :
The TV is turned on automatically and switches to the
appropriate HDMI input whenever VIERA Link compatible equipment
is initially turned on and the Play mode is selected.
Power off link
When
Yes is selected and
the TV is turned off, all connected VIERA Link compatible
equipment is also automatically turned off.
- A Panasonic DVD Recorder will not turn off if it is still
in Rec mode.
- The TV remains on even if the VIERA Link compatible
equipment is turned off.
Energy saving mode
Quick start:
When TV is turned off, all connected VIERA Link compatible
equipment is moved to ECO Standby mode automatically under
these conditions.
- Power off link ( Yes
):
The connected equipment has “HDAVI Control 4 or later (with
Quick Start mode)”
* : Minimum power consumption of Standby condition for the
equipment.
Unselected device auto off
On :
The connected VIERA Link compatible equipment will be turned
off automatically when not in use under these conditions.
- The connected equipment has “HDAVI Control 2 or later” (for
available equipment only)
(Example)
– When the input is switched from HDMI.
Automatic lip-sync function
Minimizes time delay between the picture and audio when you
connect to a Panasonic theater system or Amplifier.
VIERA Link
Some features are disabled depending on the “HDAVI Control”
version of the equipment.
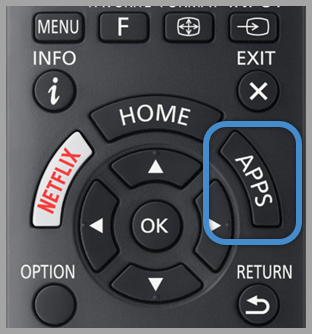
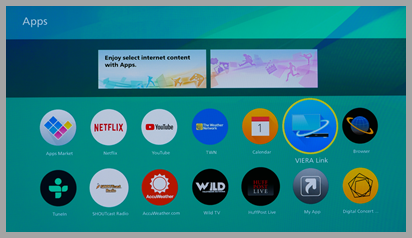
- Display the VIERA Link menu, Press the [ APPS ]
button

- Select [ VIERA Link ]

- Select the item and set ( VIERA Link control / Speaker
output / Back to TV )
Items in the VIERA Link menu may be grayed out if no compatible
equipment is connected (must be HDAVI Control 2 or later) or if
the equipment has not initiated a connection with the TV. In
that case, switch the equipment’s power Off and On while the TV
is On.
Speaker control
You can select the Home theater or TV speakers for audio
output. Control the theater speakers with the TV remote
control. This function is available only when a Panasonic
Amplifier or Player theater is connected.
- Select [ Speaker output ] using ▲ / ▼
- Select Home theater or TV with ▲ / ▼
Home theater :
Adjustment for the equipment [ VOL(+/-) ] and [
MUTE] buttons are available.
- The sound of the TV is muted.
- When the equipment is turned off, the TV speakers take
over.
- Selecting [ Home theater ] turns the equipment on
automatically if it is in Standby mode.
TV : The TV speakers are on.
VIERA Link control only with the TV’s remote control
- Select [ VIERA Link control ] using ▲ / ▼
- Select the desired equipment with ▲ / ▼
(You can select available items only.)
( Recorder / Home theater / Player / Camcorder / LUMIX /
Other )
- If there is more than one equipment item, a number
after the name indicates the number of items. (e.g.
Recorder 1/Recorder 2/Recorder 3...)
- The number of equipment items that can be connected is
three for recorders, and a total of three for Home
Theater/Player/Camcorder/ LUMIX/Others.
- Operate the equipment with the TV remote control, pointing
it at the TV
- There is a limit to the number of HDMI connectors.
- To operate the equipment, read the manual for the
equipment.
- For available TV remote control buttons, whether or not an
operation is available depends on the connected equipment.
Back to TV
Returns the input selection of the device selected with the
VIERA Link Control to the TV input.
- Select "Back to
TV" using ▲ / ▼ and press [OK].
These instructions apply to models CX600, FX700, FX600, FX800,
FX800, EZ950, EZ1000, FZ1000, FZ950, GX800, GX880, GZ1000,
GZ2000.


